
I discovered Kamailio when I needed to develop an SBC (Session Border Controller) whose primary function was to protect an Asterisk instance. Since then, the initial requirement has evolved, and by definition, the technical solution has as well. I have been able to improve my skills with the software and, in the process, gained flexibility with it within a VoIP technical stack.
Since online resources regarding Kamailio use cases are relatively limited, I will try to explain this software through a series of articles featuring configuration examples.
First and foremost, before diving deeper into this tutorial, it is recommended to have some knowledge of SIP (RFC 3261).
Definitions
To better understand the concepts mentioned in this article and the broader Kamailio ecosystem, here is a list of essential definitions.
Core SIP Roles
- SIP (Session Initiation Protocol): An application-layer signaling protocol used for initiating, maintaining, and terminating real-time sessions that include voice, video, and messaging.
- UAC (User Agent Client): A logical entity that creates a new SIP request. For example, when you pick up a VoIP phone to dial a number, the phone acts as a
UACto initiate theINVITE. - UAS (User Agent Server): A logical entity that generates a response to a SIP request. When a phone receives an
INVITEand sends back a180 Ringingor200 OK, it is acting as aUAS. - B2BUA (Back-to-Back User Agent): Unlike a proxy, a
B2BUAacts as both aUASand aUACsimultaneously. it terminates the incoming call leg and starts a new outgoing leg, giving it full control over the media and signaling (e.g., Asterisk or FreeSWITCH).
Note: Most SIP endpoints (like IP phones or PBXs) act as both a UAC and UAS depending on whether they are making or receiving a call
VoIP Components
- SIP Proxy: A server that acts as an intermediary, forwarding SIP requests to another entity. Kamailio’s primary strength is acting as a high-performance, programmable proxy.
- Registrar: A server that accepts
REGISTERrequests and places the information it receives (the association between a user’s URI and their current IP address) into a location service. - SBC (Session Border Controller): A specialized device or software (like Kamailio) used to protect and manage the flow of signaling and media at the “border” of a network. It handles security (hiding internal topology), NAT traversal, and protocol normalization.
- AoR (Address of Record): A SIP URI that points to a domain with a location service where the user can be reached. For example:
sip:user@example.com. - RTPEngine: A proxy for RTP traffic. Since Kamailio generally only handles signaling (SIP), it often uses
rtpengineto proxy the actual audio/video data (RTP) between different network interfaces and users.
Switching Classes
- Class 4 Softswitch (Wholesale/Carrier): These are designed for routing large volumes of long-distance VoIP traffic between different providers and networks. They focus on Least Cost Routing (LCR), scale, and reliability rather than user features like voicemail or call waiting.
- Class 5 Softswitch (Retail/Resident): These are intended for the end-user. They provide the actual telephony services and “features” we are familiar with, such as call forwarding, automated attendants, Hunt Groups, and Voicemail-to-Email.
What is Kamailio?

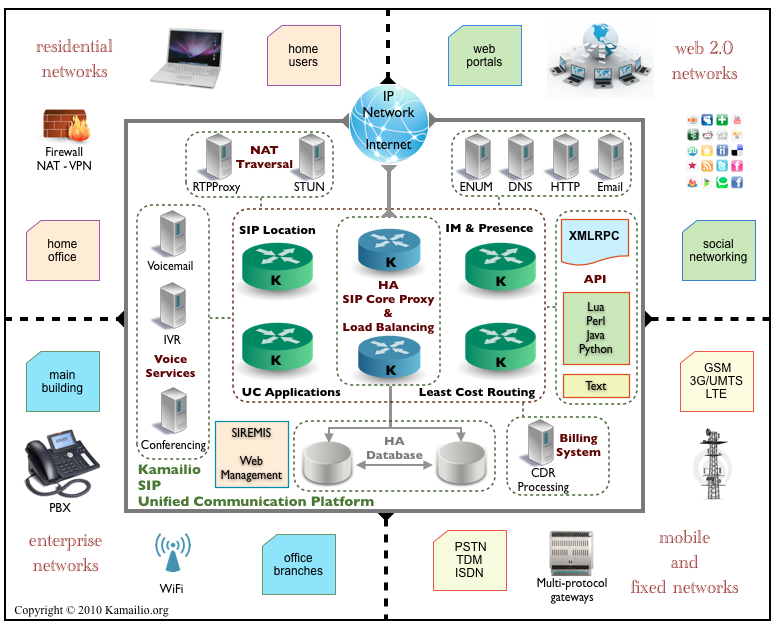
Kamailio (formerly OpenSER) is a free and open-source SIP server. It is written in C with a specific focus on performance. Kamailio is highly configurable and can act as a SIP registrar, proxy, or even a load-balancer, thanks to its modular architecture.
Contrary to what one might think, Kamailio is not a PBX and differs from Asterisk, FreeSwitch, and the like. Kamailio is also not a B2BUA (Back-to-Back User Agent); it only manages signaling (SIP), whereas a PBX will additionally manage media (voice) or include call-center features.
To meet a specific need with Kamailio, you must configure it. The default Kamailio configuration does nothing; however, it provides a glimpse of the software’s possibilities. This is also why SIP knowledge is necessary, as you must have an idea of the requests and responses required for the software to function correctly.
Note : media is not handled by Kamailio. For this, I recommand RTPEngine from SIPWise.
Where to find Kamailio documentation?
On the official Kamailio website, you can find two types of documentation: the official wiki and the modules documentation. The official documentation is very thorough, and both the Wiki and the module pages explain Kamailio’s configuration very well.
On the other hand, when it comes to specific use cases and architectures involving third-party components, it is harder to get a high-level overview. Figures like Fred POSNER often praise Kamailio, and thankfully, the Kamailio World YouTube channel exists. Additionally, it is possible to draw inspiration from OpenSIPS documentation and its tutorials, although differences between the two projects appear very quickly.
Installing Kamailio
Kamailio is available on Linux and BSD. On Ubuntu, install Kamailio from the official repositories: $ sudo apt install kamailio
Edit the configuration: /etc/kamailio.cfg.
It is also possible to use Kamailio with Docker using a configuration like the one below:
networks:
  default:
  # database:
  #   external: true

services:
  # Primary Kamailio instance
  kamailio:
    image: ghcr.io/kamailio/kamailio:6.0.4-bookworm
    restart: unless-stopped
    volumes:
      - ./kamailio:/etc/kamailio
      - ./kamailio/logs/kamailio:/var/log/kamailio
    network_mode: host # Expose 5060 for TCP/UDP and 5061 for TLS

  # RTP Engine service
  rtpengine:
    image: fonoster/rtpengine:latest
    container_name: rtpengine
    restart: unless-stopped
    network_mode: "host" # At the moment this option only works in Linux
    environment:
      # RTPENGINE_PUBLIC_IP: ${DOCKER_HOST_ADDRESS:-192.168.1.210} When commented, use Netdiscover
      RTPENGINE_BIND_NG_IP: ${RTPENGINE_BIND_NG_IP:-127.0.0.1}
      RTPENGINE_BIND_NG_PORT: ${RTPENGINE_BIND_NG_PORT:-2223}
      RTPENGINE_PORT_MIN: 10000
      RTPENGINE_PORT_MAX: 20000
      RTPENGINE_LOG_LEVEL: "6"
Note that network_mode: host is only supported on Linux. Furthermore, SIP and RTP protocols do not handle NAT (Network Address Translation) very well if you decide to expose Kamailio and RTPEngine ports via Docker mapping.
Some SIP Notions
For this first article, I will list some of the SIP requests you should know. They will be useful whether you are working with Kamailio or any other PBX.
| SIP Request | Description |
|---|---|
| INVITE | Initiates a call session. |
| ACK | Confirms the receipt of a final response (e.g., after INVITE). |
| BYE | Terminates an existing session. |
| CANCEL | Cancels a pending INVITE request before it is answered. |
| REGISTER | Registers a user’s location with a SIP server. |
| OPTIONS | Queries the capabilities of a server or endpoint. |
| INFO | Carries mid-session control information (e.g., DTMF). |
| PRACK | Acknowledges reliable provisional responses. |
| UPDATE | Modifies session parameters without re-issuing an INVITE. |
| REFER | Requests the recipient to initiate a new request (often for call transfers). |
Discovering Kamailio
Let’s begin this tutorial with Kamailio. Here are a few SIP concepts that will be useful if you are a beginner. At the very least, they will serve as a refresher.
Example of an INVITE request
Take the example of a SIP request used to place a call: INVITE. Imagine two users, 1001 and 1002, where 1001 wants to call 1002.
According to RFC 3261, 1001 must send a SIP request to 1002; however, this implies knowing the IP address and the port where 1002 is available. In practice, it never works this way; 1001 will send this request to a SIP server which will be responsible for relaying it (like a proxy) or issuing a new one (like a PBX/B2BUA).
INVITE sip:1002@voip.operator.re SIP/2.0In a setup with two phones, this request makes 1002‘s phone “ring.” If we sent this message to a generic PBX, it would have the necessary logic to know it has an extension 1001 and would ring extension 1002.
With a PBX
A generic PBX examines the Request-URI in the received INVITE message and has predefined logic to know that 1002 is a device it has registered and that we want to connect to that device. It then sends the call to the corresponding device (1002). This is the “classic” operation of Asterisk, FreeSwitch, or any PBX. To put it simply, if we send this request to Asterisk, it would verify that it has the users (endpoints in PJSIP) and, if the dialplan allows, redirect the request to the recipient (example dialplan line: Dial(PJSIP/${EXTEN},30,tTr)). Response management is automatic with a PBX, as it focuses on the core logic: establishing calls between users, whether local or remote via a trunk.
With Kamailio
Kamailio works in a completely different way. If you want Kamailio to react to this request, you must write it into its configuration and instruct it—much like a programming language—on what actions to take. Roughly speaking, this would involve programming Kamailio to accept INVITE requests, check if the recipient’s Address of Record (AoR) is in memory, respond with a 100 Trying, forward the INVITE to the destination, and finally return a 200 OK to the caller. This results in the following diagram:

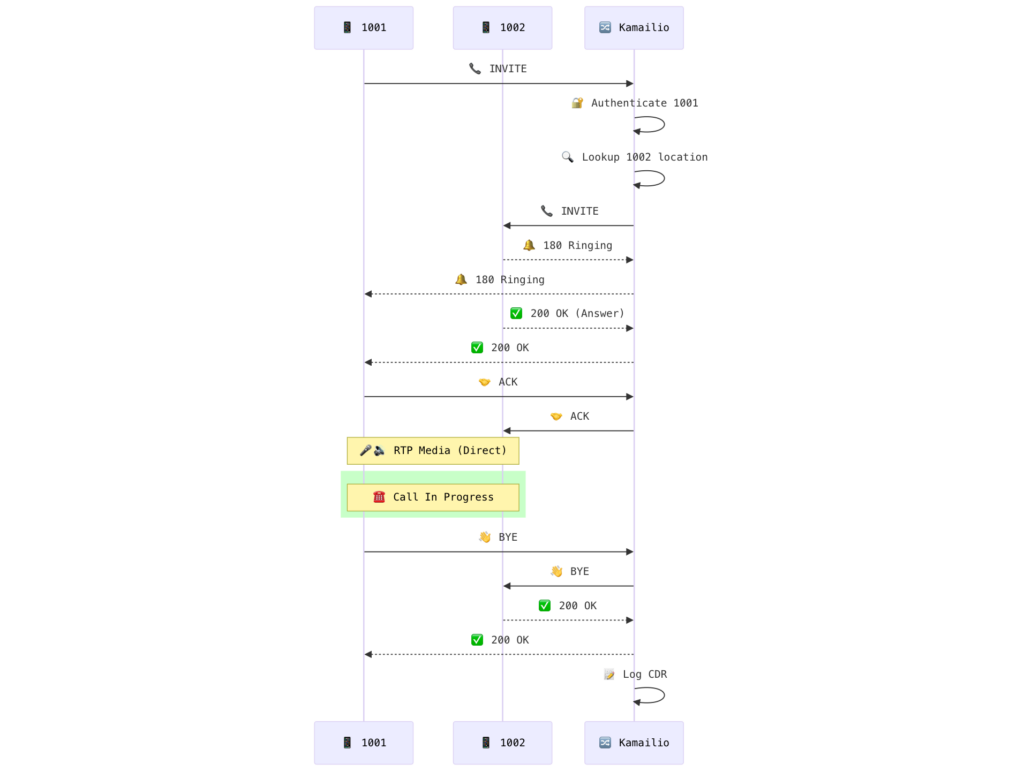
Here, I have omitted the fact that we must also handle 4XX responses if the callee is busy or away, manage users, and handle voice media (RTP). While all of this might seem difficult to manage, it is essentially “programming” in the broad sense of the term.
Even if this example seems basic, it helps you understand how the system handles and routes your SIP messages. Ultimately, this opens the door to many features, such as managing prepaid or postpaid call authorizations, saving Call Detail Records (CDRs), implementing firewalling, load-balancing, Least Cost Routing (LCR), and more.
Final Word
Kamailio is a software that is difficult to master. Initial encounters can be daunting, and you may sometimes feel like giving up. With a bit of experience, it is possible to achieve great things with Kamailio, which can be used as a Class 5 softswitch (for profesionnals) or a Class 4 softswitch (for ISP and ITSP).