
VoIP (Voice over IP) is revolutionizing telephony by using the Internet for calls. The interconnection of Asterisk servers is a game-changer for small ISPs and multi-site companies looking for a flexible and scalable telephony solution.
This practical guide explains how to configure a SIP trunk with Asterisk and PJSIP to link two servers. It is ideal for providing SIP trunks to customers or connecting remote offices. It covers the basics of VoIP trunking, configuration, and the management of SIP endpoints (end users).
What is Asterisk?

Asterisk is a free, open-source software for creating VoIP telephony systems. Originally developed by Digium (acquired by Sangoma in 2018), it handles voice calls, video, and messaging over IP.
Versatile in nature, it ranges from a simple PBX (telephone exchange) to an advanced softswitch or SBC (Session Border Controller) for managing media flows. It powers corporate PBXs and complex call centers alike.
Highly customizable, Asterisk supports SIP via the PJSIP module (the currently maintained implementation), XMPP for SMS, and SMTP for emails. For a small ISP, it can centralize calls between endpoints (phones or clients) and PSTN (Public Switched Telephone Network) services.
Understanding Trunks in VoIP
A trunk is a link that carries multiple simultaneous calls between servers or operators.
Once physical lines such as E1 (Europe) or T1 (USA) marketed by operators like France Télécom or AT&T, trunks are now virtual and run over the Internet thanks to VoIP. In this case, it makes Asterisk trunk configuration accessible to companies and administrators eager to learn more.
In Asterisk, think of a trunk as a link that connects your server to a VoIP operator (such as OVH or Telnyx) or another IPBX client.
Compared to its historical counterpart, VoIP trunking brings significant advantages:
- Cost Savings: Requires only Internet access, without the need for dedicated hardware.
- Scalability: From 10 to 10,000 calls by simply adding server resources, making it an ideal use case for call centers.
- Flexibility: Intelligent routing by time, by Caller ID (phone number), or according to custom rules.
SIP: The Heart of VoIP
SIP (standing for Session Initiation Protocol, according to RFC 3261) initiates, maintains, and terminates VoIP sessions. It handles signaling—in other words: call creation, transfers, terminations, or even “unavailable” messages.
Note: SIP does not handle media (audio and video). This is the function of RTP.
Media Management (Audio and Video)
While SIP orchestrates connections, media (voice and video) flows separately via RTP (Real-time Transport Protocol) using UDP.
During communication, SIP requests carry indications regarding the media to be used, and the terminals agree on a common codec. Once a call is successfully established, SIP signals the location where the audio packets should be sent.
Since Asterisk is an IPBX, it handles codecs like G.722 or Opus for HD Internet communications and G.711 (alaw in Europe and ulaw in the USA) for standard phone calls. When an audio stream passes through Asterisk, it can transcode the media so that different terminals and users can connect.
Lab Presentation and Implementation
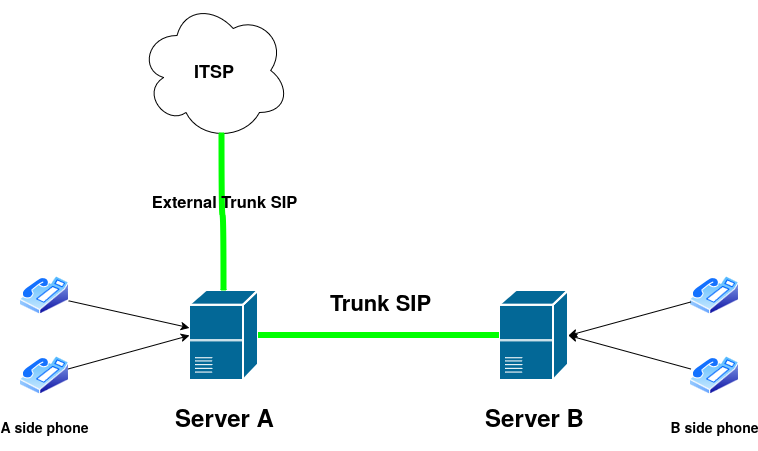
To illustrate and help you reach your goal, I have chosen to limit this guide to two Asterisk instances.
On one side, we have Instance A, which will be the “master” instance. It will be attached to an operator SIP trunk (ITSP), which could be from OVH, Orange, SFR, Twilio, or another provider.
On the other side, we have Instance B, which will be the “slave” instance. It will have a SIP trunk pointing towards the master instance.
Instance A is therefore the provider, and Instance B is the client. In essence, this scenario also works if you are a company with remote offices where you want landline telephony.
Configuring a Trunk to Interconnect Two Asterisk Instances
This guide assumes the use of Asterisk 18+ with PJSIP. If this is not your case, I encourage you to update to the latest versions, which offer more flexibility than the software’s historical SIP driver.
We assume Instance A owns the extension range 1000 to 1999 and Instance B owns 2000 to 2999. You can define any numbers you wish for your specific use case.
Before starting, we assume that:
- Both servers are on stable networks with public IP addresses.
- Firewall ports are open: 5060 UDP/TCP (SIP), 10000-20000 UDP.
Installing Asterisk
Asterisk is available in the official repositories for CentOS (RIP) and Ubuntu.
The first step is to install Asterisk on the Linux instances. The package is natively available on many distributions, including Ubuntu.
- On CentOS:
sudo dnf install asterisk - On Ubuntu:
sudo apt install asterisk
Configuration files are installed in the following folder: /etc/asterisk. The important files for our purpose are pjsip.conf and extensions.conf.
Make a backup of the original configuration:
sudo cp /etc/asterisk/pjsip.conf /etc/asterisk/pjsip.conf.bakConfiguring Server A: Provider Side
This part is to be performed on Server A (the master). We will edit the PJSIP configuration to declare Instance B, so it can register and identify itself to send and receive calls.
This server acts as the trunk provider. Phones can also register on Instance A and communicate with each other in the 1000 to 1999 range, or reach the 2000 to 2999 range via the newly created trunk.
Configuring PJSIP
Define the protocols supported by Asterisk for signaling and media:
; /etc/asterisk/pjsip.conf
; Definition of IPv4 and IPv6 transports

[transport-tcp]
type=transport ; Define a transport type for SIP management
protocol=tcp ; TCP only here
bind=0.0.0.0:5060 ; Listen on all IPv4 interfaces on TCP 5060

[transport-udp6]
type=transport
protocol=udp
bind=[::]:5060 ; Listen on all IPv6 interfaces on port 5060

[transport-tcp6]
type=transport
protocol=tcp
bind=[::]:5060

[transport-udp]
type=transport
protocol=udp
bind=0.0.0.0:5060 ; Listen on all IPv4 interfaces on port 5060 (SIP standard)
Define the client (Server B):
; /etc/asterisk/pjsip.conf
; Client definition (Server B)

[trunk-customer-b]
type=endpoint
; transport=transport-udp ; Line can be omitted to allow IPv4/IPv6 via UDP or TCP
context=subscriber  ; Context or dialplan assigned to the client. See later in the article.
disallow=all ; Disallow all codecs
allow=opus,g722,alaw,ulaw  ; Allow a limited number of codecs
auth=trunk-customer-b-auth ; Credentials associated with this endpoint (user)
aors=trunk-customer-b-aor ; Address of Record for the endpoint
direct_media=no  ; Forces audio media to pass through Asterisk. Useful if the client is behind NAT.
Define identification settings for Server B:
; /etc/asterisk/pjsip.conf
[trunk-customer-b-auth]
type=auth
auth_type=userpass
username=trunkuser  ; Client username
password=strongpass123 ; Password
; realm=asterisk ; Optional, defaults to 'asterisk'

[trunk-customer-b-aor]
type=aor ; AoR = Address of Record
max_contacts=1 ; Allows only one registration from Instance B
; contact=sip:192.0.2.2:5060  ; Define if the client has a static IP and does not use REGISTER to identify. Enabling this makes Instance B stateless.
These lines configure Instance A as a SIP trunk provider with mandatory identification for the client (Instance B). The auth section enforces a username/password for PJSIP authentication in Asterisk, preventing unauthorized access.
Configuring the Dialplan
I am defining a simple dialplan here. My goal is to allow Instance B to reach Instance A’s phones and vice versa. On both instances, the trunk will be assigned to the subscriber context, as will the registered phones.
The dialplan is located in: /etc/asterisk/extensions.conf.
; /etc/asterisk/extensions.conf

[subscriber]

; Routing towards Server B
exten => _2XXX,1,NoOp(Incoming request in subscriber going to instance B) ; Log entry for calls to Server B
same => n,Dial(PJSIP/${EXTEN}@trunk-customer-b) ; Redirect the phone request to Asterisk Instance B
same => n,Hangup()

; General rule for all other numbers
exten => _X.,1,NoOp(Incoming request in subscriber context)
same => n,Dial(PJSIP/${EXTEN},30,tTr)  ; Call a user in the same context with 30s timeout and ringing state tracking.
same => n,Hangup()
This dialplan does two things: first, it redirects numbers in the 2000-2999 range to Instance B; second, it contacts locally registered phones.
Configuring Server B: Client Side
Server B is the one under the client’s responsibility. This Asterisk instance registers with Server A. Phones can also register on Instance B to communicate with each other (2000-2999) or place calls to Instance A (1000-1999) or even externally via Instance A’s operator trunk.
Configuring PJSIP
; /etc/asterisk/pjsip.conf

; Definition of transports (UDP/TCP/IPv4/IPv6) as seen in Server A...

; Definition of Server A: the trunk provider

[trunk-isp-a]
type=endpoint
context=from-instance-a  ; Context for calls from Server A
disallow=all
allow=opus,g722,alaw,ulaw
auth=trunk-isp-a-auth
aors=trunk-isp-a-aor
outbound_auth=trunk-isp-a-auth

[trunk-isp-a-auth]
type=auth
auth_type=userpass
username=trunkuser
password=strongpass123

[trunk-isp-a-aor]
type=aor
max_contacts=1
contact=sip:IP_OF_SERVER_A:5060 ; Important for the client to reach the master
Server B authenticates with Server A, effectively enabling bidirectional VoIP trunking.
Configuring the Dialplan
; /etc/asterisk/extensions.conf

; For internal phones
[internal]

; Routing towards Server A
exten => _1XXX,1,NoOp(Routing request from internal to Instance A)
same => n,Dial(PJSIP/${EXTEN}@trunk-isp-a) ; Redirect request to Instance A
same => n,Hangup()

exten => _X.,1,NoOp(Incoming request in internal context)
same => n,Dial(PJSIP/${EXTEN},30,tTr)
same => n,Hangup()

; For incoming calls from the trunk
[from-instance-a]
exten => _X.,1,NoOp(Incoming call from ISP trunk A)
same => n,Dial(PJSIP/${EXTEN}@internal,30,tTr) ; Redirect calls to phones in the internal context
same => n,Hangup()
Validation
Now that both instances are configured, test the service by registering phones (or softphones) on both instances and trying to place calls between the ranges. You can also use the Asterisk CLI (sudo asterisk -rvvv) to troubleshoot.
Closing words
Although somewhat complex, this guide provides a solution for interconnecting two Asterisk instances. While the interconnection is currently static, one could imagine adding an API (in Go or Python) in the future to create dynamic trunk configurations on the fly.